Get 13 need-to-know tips on website SEO—whether or not you use Webflow.
On the modern web, having a website is only half the battle.
The other half? Getting people to your website. And in many ways, that’s a much harder battle to wage.
After all, nobody’s stopping you from building a website. With tools like Webflow, it’s never been easier to get yourself online in a big, bold, dynamic, and responsive way.
But when it comes to getting people to check out your site, you’ve got some competition. A lot of competition. Depending on the topics you create content about, you could be entering a veritable content war—a war with thousands of other opponents.
To survive—and hopefully, win—that war, you’ll need to think about how to optimize your website for search engines (i.e., how to do SEO).
But the first, and most important thing, to remember is that you should never optimize your site for search engines.
You should optimize your website for humans who use search engines.
After all, search engines exist for humans. They’ve been optimized by some of the world’s top engineers to serve human beings the most relevant, helpful content they can find on any given topic. Plus, search engines take sharing statistics and external links into account when ranking pages, so above all else, your content should:
- Clearly and helpful answer people’s questions
- Be “shareable”—i.e., so helpful and/or entertaining that people can’t help but share it
In short, there’s one simple key to SEO: make your content amazing.
That said, there are many things you can do in Webflow to optimize for search that alsohelp improve the clarity, helpfulness, and shareability of your content, so you can optimize for search and for humans at the same time.
Let’s dig into those.
1. Design responsively
This one’s easy, because Webflow was built for responsive design.
But it’s important not to overlook the importance of this. Ensuring your website’s responsive does two key things for your SEO:
- It gets you the all-important “mobile-friendly” tag in search
- It helps provide a better experience for everyone by making it easier to give everyone the same content and functionality across every device
And because you have an easy way to preview your site on mobile devices right inside Webflow, you’ll always have mobile in mind when crafting both your design and content.
2. Research keywords and write “SERP-in” content
When you’re trying to rank highly in search, you have to think in specific terms. And by “specific terms,” I literally mean “specific terms.”
So, before you start writing, do some keyword research to find out what terms people actually search for that are relevant to your business.
Now, the term “keyword research” might sound a little imposing—or expensive (because it can be).
But there are some very easy ways to do some light keyword research that can be very fruitful in generating topics for you to write about. Here’s a couple:
Use Google’s search suggestions
The easiest way to get ideas for “SERP-in” content is to head to google.com and start typing.
Let’s say you’re writing a web design blog and want to start creating content about “responsive web design.”
I head to Google and type that term, and here’s what I see:

And boom! In approximately 0.45 seconds, I’ve got 3 broad topics (templates, examples, and tutorials) I can turn into at least 3 blog posts or pages—and with a little effort, far, far more.
Especially if I add a step.
Use Google Trends
Now, I’ll head over to Google Trends and enter the same terms Google automatically suggested to me. With all that entered, I get the following information.
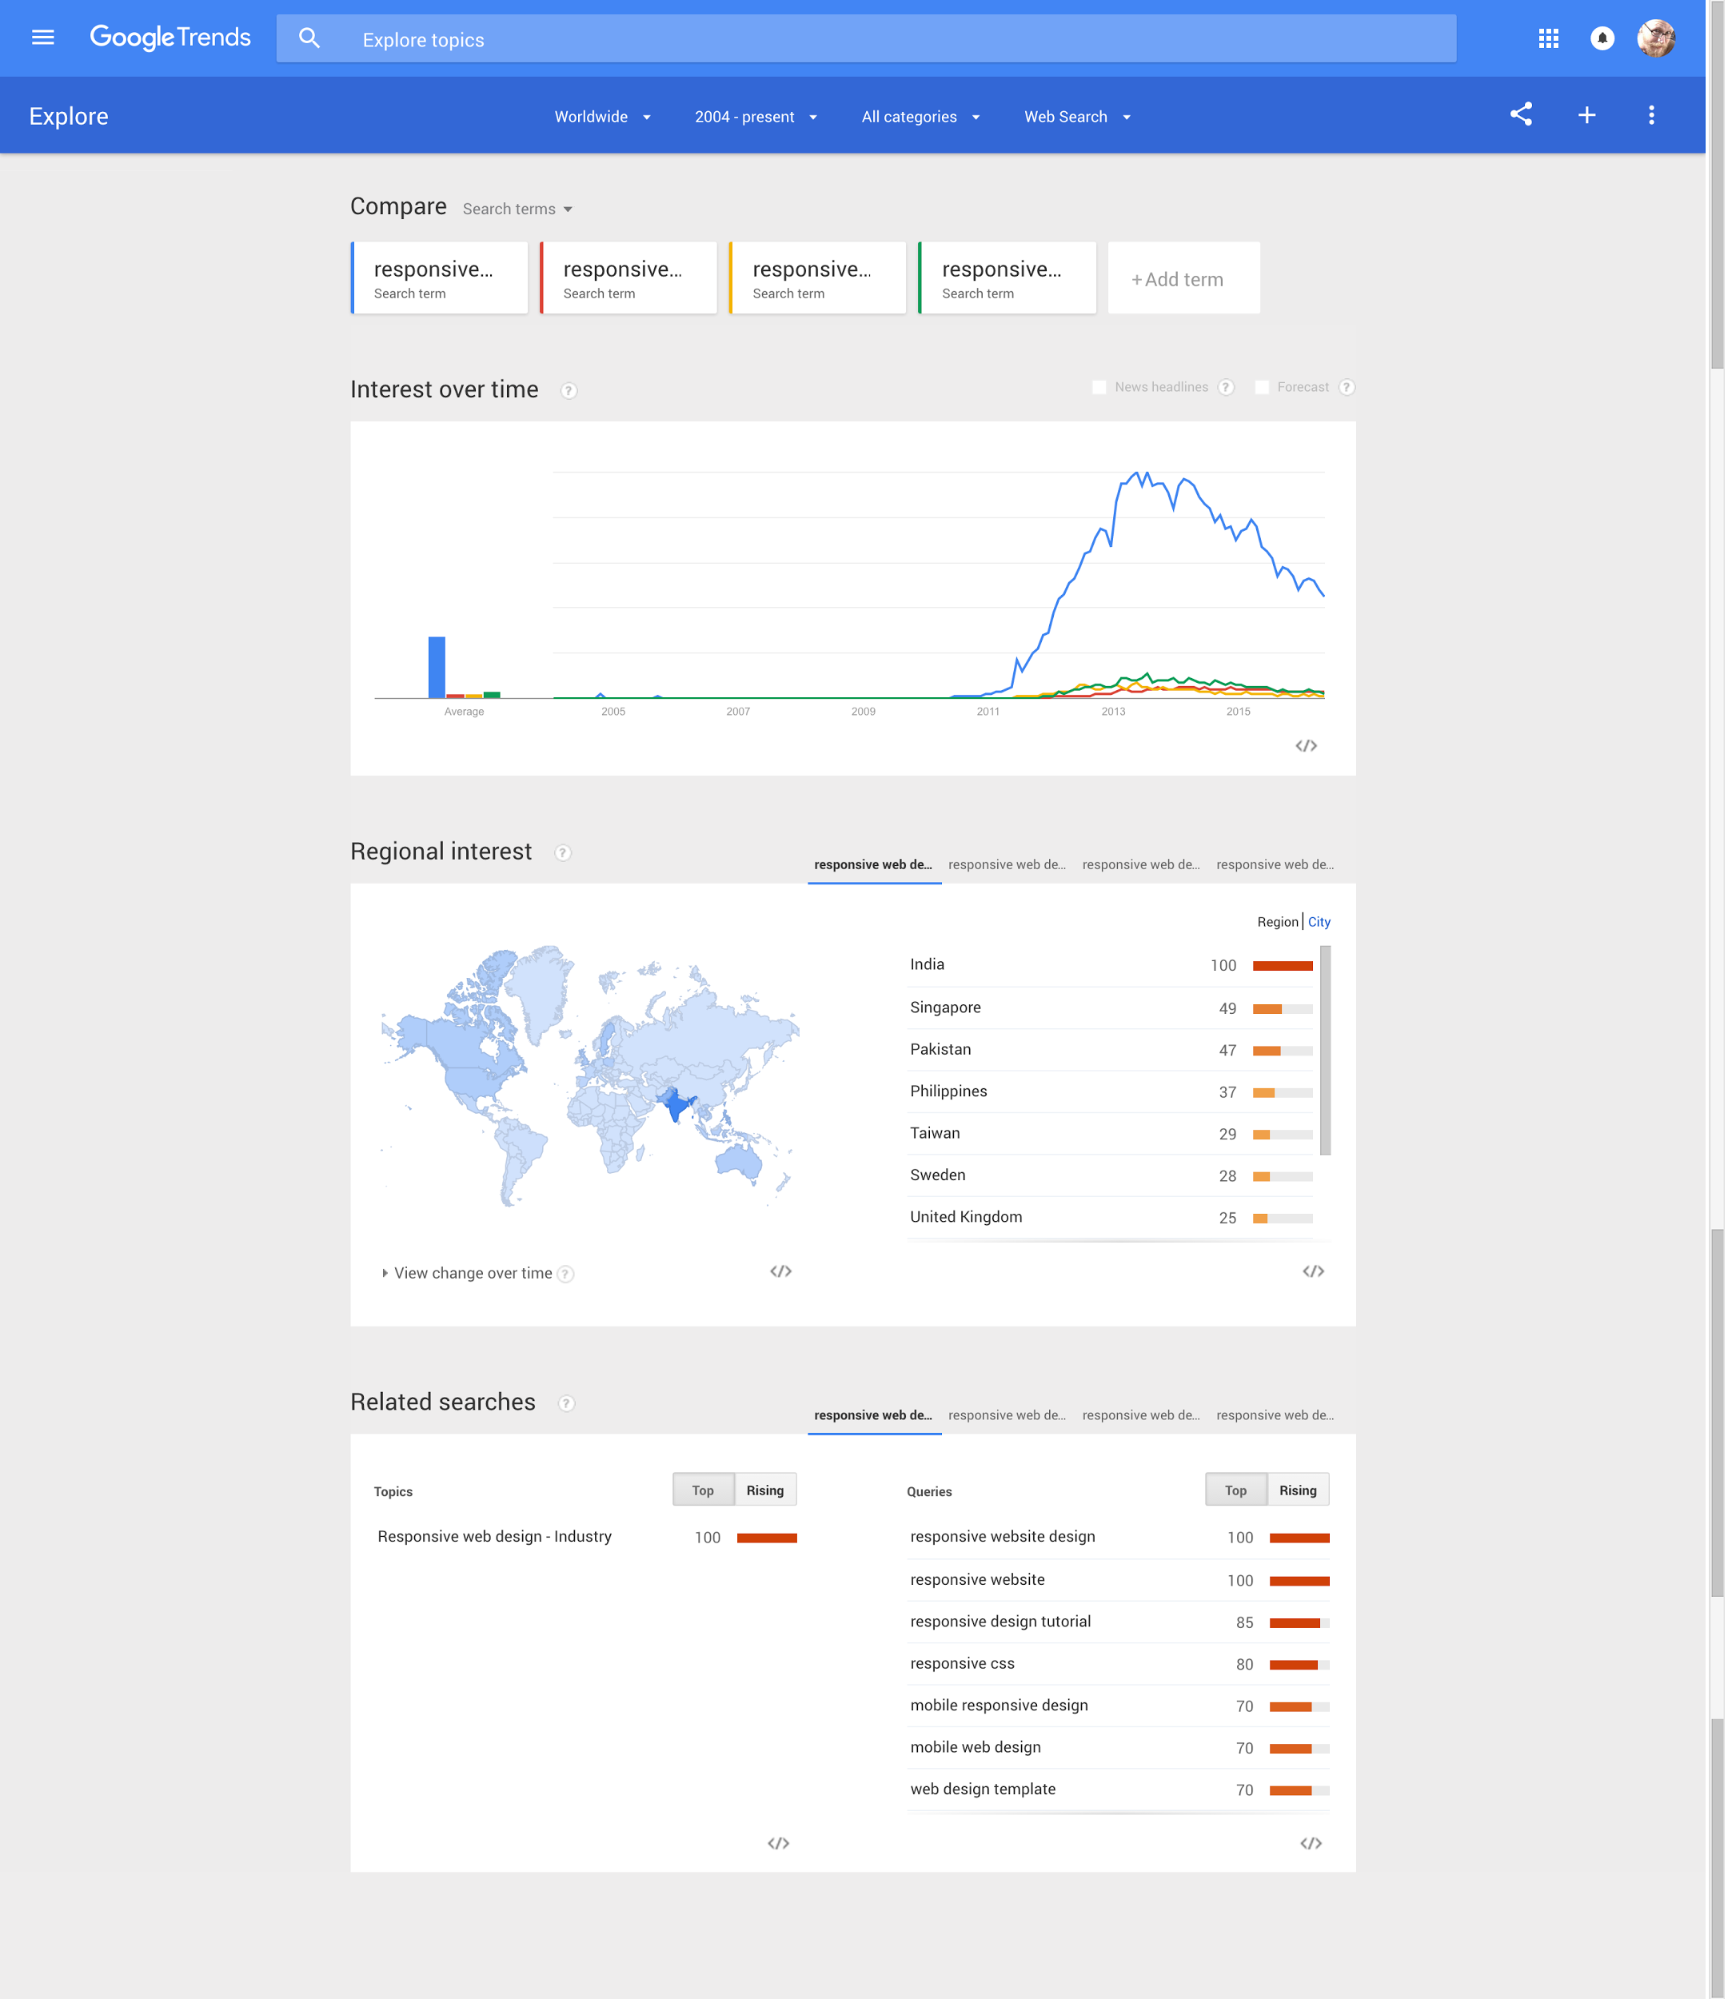
So. Much. Information.
At the top I see “Interest over time,” which tells me a lot about this topic across the historical dimension, but also offers a gauge of the relative popularity of all these terms.
That can help me make decisions about what content to prioritize. The graph also gives me a sense of how difficult it might be to rank for these terms, if only in a very abstract way. For example, the general term “responsive web design” (blue line) is by far the most popular, and will thus be hardest to rank for.
I can also see interest in the term by region, which immediately tells me that this topic is hot in southern Asia. Very handy if I want to target readers in that area.
Finally, and most usefully for content generation, I see the “Related searches” section. Hello, more content ideas!
Use Google AdWords’ Keyword Planner
Even if you’re not planning on running any search engine marketing (SEM) campaigns, Google’s Keyword Planner gives you incredibly useful information like:
- Average monthly search volume per keyword
- Average cost per click (CPC) for keywords
- Level of competition per keyword
All super useful for prioritizing terms to write content for.
For example, if I see that a term has really high search volume and high cost per click, I know there’s going to be a lot of competition to rank for that term. And that means that I might have more luck targeting a more specific search term or phrase with less competition.
Now start writing that SERP-in content!
Ok, so now you know what to write about. The next step is to actually get down to the writing (or filming, or podcasting, or whatever).
All that research you’ve just done now becomes even more valuable—because now you can ensure that your content focuses on that topic with laser precision. And that informs more than just the topic and discussion points.
It also gives me words and phrases that have to appear in the:
- Meta title
- Meta description
- URL
- H1
- H2s
And, if you’re cross-linking between pages on your site (as you totally should be), it gives you terms that you should use in linking to this new content.
So if I’m writing a page focused on “responsive web design examples,” I can start writing all those page elements before I even have the whole post or page outlined. Like so:
- Meta title: 10 beautiful responsive web design examples
- Meta description: Check out 10 examples of responsive web design in action, and learn how to design your own responsive website.
- URL: mysite.com/responsive-web-design-examples
- H1: 10 beautiful responsive web design examples
- H2s: Responsive web design example #1 (and #2 and #3, etc.)
- And, I know I should embed links to this page in the phrase “responsive web design examples”
And now I’ve got the structure for a highly SEO-optimized page in place. Easy.
Play the “what is it?” game
I once worked very closely with a brilliant SEO by the name of Nick Musica. He taught me a lot about search (much of which I forgot—sorry, Nick), but among those things that stuck, the “what is it?” game ranks highly.
Basically, we “good” writers are very used to omitting the subjects of our sentences after an initial reference. Because usually, what we’re talking about is clear to anyone who’s reading our content continuously.
But many people don’t read content on the web continuously. Instead, they scan—which means they won’t always know what I’m talking about when I say “it.”
So after you write up your content, hit Ctrl+F and search the word “it.” Then replace instances of “it” with the appropriate noun. Then do that again with generic forms of your focus term. So, if I’m writing about “responsive websites,” I’d Ctrl+F variants like “site,” “website,” etc.
3. Put your most important pages up top
To Google, your most important pages—the pages you want to do really well in search—are your top-level pages.
What do I mean by “top-level pages”? I mean the pages on your root domain level. Examples from webflow.com include:
- webflow.com/cms
- webflow.com/designer
- webflow.com/pricing
Because we thought these pages were important enough to put at the very top of our site, Google thinks they’re pretty important too. It wants to find the best and most helpful content there, so it’s on us to put that content there.
So, if there are pages you really want to rank well in search, make sure they’re not buried in a folder somewhere. Pages buried in folders can rank well in search, but they’ll do best for highly specific questions like “how to build a slider in Webflow.”
For more general queries—like “website builder,” for example—you’ll want a top-level page to compete with all the other content out there that’s gunning for that same term.
4. Subdomain responsibly
Hate to break it to you, but as far as Google’s concerned, your subdomain is a completely different website than your root domain.
This has benefits and drawbacks, so this doesn’t mean you shouldn’t use subdomains. It just means that, when you do so, you should do it consciously. Know that this subdomain, no matter how popular, isn’t going to feed directly into the your core site’s SEO. Know that, if it does help, it will do so via the links that take people from the subdomain to your core site.
So that subdomain better be useful, entertaining, and shareable—and actually have links to your core site sprinkled throughout.
Note that one of the ramifications of this is that you should put your blog on your root domain, not a subdomain, if you want it to benefit your main website.
Putting your blog on a subdomain is a big, and extremely common, mistake.
5. Optimize your URLs, meta titles, and descriptions
As you probably picked up from tip #2 above—especially the “Now start writing…” bit—it’s vital that you have your target keywords/keyphrases in mind when you write your content.
That way, search engine optimization becomes a simple matter of including your target keyword or phrase in all the right places (title, description, URL, H1s and 2s, etc.) and staying on topic.
Doing it the other way around—i.e., optimizing after you write—is actually harder, and can lead to mismatches between the target keyword and what your page is actually about. That’s not to say you can’t do after-the-fact optimizations, but it’s not ideal.
Note that Webflow gives you complete control over your page’s URLs, titles, and descriptions for both static and dynamic content. And with dynamic content, you can actually automate the definition of your titles and descriptions using fields in your Collections.
Pro tip: Turn Webflow CMS into your style guide
Create fields for your dynamic Collections that will directly translate to your meta title and description, then set character limits for each based on the current “ideal” lengths of 55 characters for title (subtracting your site title, if you use it in your title tag) and 155 for description.
6. 301 redirect for the win
The beauty of the web is that it’s never fixed, never static. You can constantly reinvent your website’s design, content, and information architecture to create the best experience for your users.
But there’s a drawback to that: when you change site structure, you often end up deleting pages, or simply changing where they “live” on the site.
Thankfully, there’s the 301 redirect for that.
Whenever you delete a page, make sure to redirect the old URL to a new one with similar (and hopefully, more useful) content. And if you’re moving a page to a different location—and hence, a different URL—set up a redirect to the new location.
The beauty of the 301 redirect is that it preserves so-called “link juice”—the SEO equity a page has built up over time—so the new page can enjoy the same rank the old page had. Or, hopefully, even better.
7. Make it canonical
With a little custom code inside the <head> tag, you can use a handy HTML tag called “rel=canonical” to ensure that Google knows what URL represents the definitive version of a particular page or bit of content.
This comes in handy if, for instance, you have an ecommerce website that generates links based on variant versions of a single product.
For example, you might sell a single T-shirt that comes in a range of sizes and colors. Depending on your ecommerce platform, each of those many variations might generate a unique URL—but they all bring people to the same page.
To Google, that can look like one of the deadliest of SEO sins: duplicate content. Because each of those URLs points to the same content, it looks like you just published 10 versions of the exact same content in an attempt to game the rankings.
But if you add rel=canonical to the most definitive version of that URL (i.e., the one you want to rank for), you shouldn’t have any duplicate content problems.
Here’s what a canonical link tag looks like in code: <link rel=”canonical” href=”https://webflow.com/blog”>.
And here it is in action on our very own blog:

We also added a “canonical link” field to our Blog Post Collection Template using the Link field type and a dynamic embed:

Just note that if you use this method, you’ll always need to add a link to the canonical field in your Collection. Otherwise, the canonical code snippet will show up empty in your source code.
Pro tip: republishing content and rel=canonical
If you’re in the habit of republishing your articles on Medium, LinkedIn, or any other blogging platform, be sure to add rel=canonical to your original post.
8. Work that (auto-generated) sitemap
When you set up custom domain hosting with us, Webflow automatically creates one key element of your site’s SEO for you: an XML sitemap.
The great thing about an XML sitemap is that it gives Google’s spiders the lay of the land, helping to guide how and where they crawl your site.
You can do all kinds of stuff with your sitemap, but its most important function is to let Google know about pages that may not be well-connected internally or linked to externally. You can also provide metadata such as when the page was last updated, how often the page is changed, and the importance of the page relative to other URLs in the site.
Note that priority isn’t particularly important for rankings—as usual, Google decides what to rank where—and that it’s relative only to other pages on your site. But no-indexing is super handy.
Beyond that, the important thing is that you have a sitemap. Thankfully, Webflow’s got you covered there.
9. Build a helpful 404 page
Creating a 404 page in Webflow couldn’t be easier. Just create a page called 404, give it a URL ending in /404, and design it however you’d like.
Boom.
But you’re not done there. Because a 404 page offers some unique opportunities to ease the pain of having hit a nonexistent page.
When a person runs into your 404 page, they’re quite possibly a bit annoyed. After all, they probably clicked this link because you told them to (in one way or another) and they wanted to either learn or do something there.
And while many sites try to mitigate that annoyance with a bit of humor—a fact we in the industry love and obsess over, a bit—I’d suggest you either steer clear, or keep it really light.
Just remember the last time you tried to tell an angry person a joke.
Instead:
- Let people know something went wrong—and be clear about it. A giant 404 centered in the screen is crystal clear to savvy web users, but most people have no idea what an error code is, let alone the specific code, 404.
- Offer an out. You can do this many ways, but some of the most helpful are: a search box (so they can search for what they came for in the first place), links to top pages or areas of your site (so they can find something related), or a link to your homepage (so they can at least reorient themselves.
- Provide a feedback mechanism. If people are hitting your 404 page, there could be something wrong that you don’t even know about. A simple CTA of “let us know” with an embedded mailto link or pre-filled tweet can let people tell you something’s wrong.
10. Alt tag all the things
Alt tags are probably the great forgotten but incredibly useful HTML element. Forgotten because they’re often hidden away in CMS interfaces, but incredibly useful because:
- They make images—a form of content that those with no or poor vision can’t normally enjoy—more accessible (because screen readers can read them)
- They give you another place to work in keywords
So be sure to add descriptive alt tags to your images. That is, make sure they describe the content of the image in a way that lets people with poor or no vision “see” them.
Include keywords when relevant. Once upon a time, people took advantage of alt tags to list 50 keywords in a place that most people would never see. Google quickly got wise to that, and will penalize you for keyword-stuffing your images.
But if you can mention a keyword in a contextually relevant and non-spammy way, by all means, do it. This will not only help Google’s standard text-search engine identify your page’s topic, but also help people using image search stumble across your site.


Also, you should give your images relevant, descriptive filenames. Do what I say, not what I do.
11. Fire up your robots(.txt)
Webflow also gives you easy access to your site’s robots.txt file via the SEO tab of your sites’ settings. The robots.txt file, as you might infer from its name, lets you provide instructions to the robots that crawl your sites, including Google’s.
The key functionality you’ll probably want here is the ability to no-index pages, which is a way of telling Google to not crawl a particular area or page of your website.
This can be very handy if you’re in progress on a page and don’t want the world to find it. (Our password protection feature, available in the Pro plan or higher, is also great for this.)
It also leads me naturally to our next tip:
12. Disable indexing of your webflow.io subdomain
One of Webflow’s handier features is that you automatically get a staging domain for every website you make: a subdomain version of your site on webflow.io.
It’s an exact copy of your website, on a different URL, that you don’t actually direct people to. And that first clause—”an exact copy of your website”—is the wonderful and awful thing about it.
Wonderful, because it lets you play. You can try new design patterns and approaches, publish that wacky blog post you’re not totally sure about—whatever.
Awful, because as far as Google’s concerned, having the same content on two different URLs is a very. Bad. Thing.
(Granted, with the increasing popularity of republishing of web content on various domains like Medium and LinkedIn, Google’s getting better at finding the source of truth for content.)
Thankfully, you can easily avoid the whole duplicate problem with one click. Just toggle “disable subdomain indexing” and you’ll be good to go.

13. Set up your Google Analytics!
Okay, so Google Analytics isn’t going to directly improve your on-page SEO. But it will give you so much information about your users, traffic sources, and content performance that not having it set up is like shooting in the dark.
SEO is all about knowing your audience
After all, the key to publishing the right content—and thus optimizing your site for search—is knowing what your users want. It’s just like they used to say on GI Joe:
Knowing is half the battle.
And now that you know, you can head into the content battle, well armed and ready to win.
If there’s anything vital I missed, let me know in the comments, and I’ll make updates as needed.